Such is the complexity of the software that it can, in some instances, take years rather than months to truly feel at ease with a program. The video above shows you how to enhance your 3D architectural visualizations in Adobe After Effects.
In our professional lives as Architects and Visualizers, though, we can’t be held up as we try to find out how to initiate a certain process, or produce an effect that will truly bring a concept to life.
In the hope we can help with your own renders – whether they are for personal or professional use – we’ve made a nuisance of ourselves by pointing our video camera at the screen of one of our less media-shy Architects.
In our latest step-by-step video tutorial, Chronos Studeos Architect and Animation Supervisor, Hassan Anifowose shows you how to create realistic post-rendering of 3D rendering in After Effects.
Considering the Chronos Studeos Media Manager (that’s me) barely wouldn’t know a render from a reindeer, I now gladly hand over to Hassan to explain more…

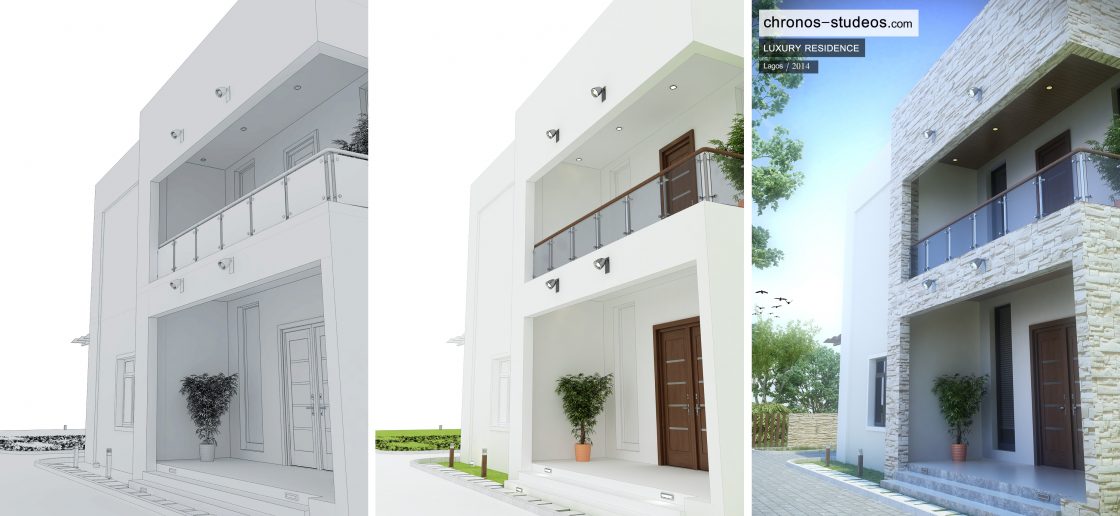
The first step in creating realistic post-rendering for your rendered images is to export render passes from your rendering software (in this case 3Dsmax). The images will enable you to enhance qualities of the rendering i.e reflection, contrast, raw lighting and shadows.


After working on the passes, it is time to enhance the RBG image with more details. Here, we work with contrast, saturation, diffusion, exposure and lens effects to further enhance photo-realism.


While our Architects continue with their hectic schedules, we here in the Chronos Studeos media team are working behind the scenes to upload more of their 3D visualizations to our online portfolio.
We’ll also be bringing you further blog posts and video tutorials, so please stay tuned and share in our journey.
In the meantime, Hassan and the rest of the Chronos Studeos architects and visualizers are keen to hear your voice, so please feel welcome to leave any questions or comments below. Or, if you prefer, email us privately via the Contacts page here.
We make sure to respond to every single message and look forward to hearing from you!
:: Chronos Studeos Video Archive ::
- How to create realistic grass & a forest eco-system in 3Ds Max with Carbon Scatter
- How to create realistic terrain in 3ds Max
- Easy animation with Path Constraint in 3ds Max
- 3D visualization Secrets Presentation (Through the Wireframe)
- The Business of Architecture: A Presentation by Architect Gregg Ihenyen
- Leadership Lessons from the 300 Spartans
- Why We Chose Civic Centre Towers for The Competition 2014


you guys seem to have a robust structure. thanks for the constant tutorials. you have helped me a great deal
Cool.
Nice tutorial.
And great execution of architectural work.
Very nice tuturial, i’m wondering if you can do a tutorial about the production on 3dmax, specially how to use all these maps and texture it please.
Hello Sergio. Ok. We will queue that up. Please come checking so you know when we have uploaded it
This is cool… But then, I’m like why go through the hassles since the same could be achieved with PS?
Yes Astron. There are photoshop tutorials showing similar workflow.